Monthly Archives: October 2024

marie callender’s pie shells instructions

Marie Callenders Pie Shells are a convenient and delicious option for homemade pies‚ offering flaky‚ made-from-scratch crusts that save time without compromising flavor or quality․

Overview of Marie Callenders Pie Shells

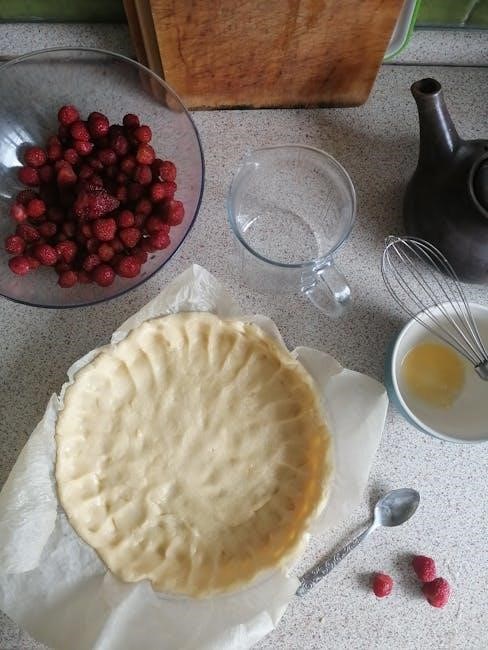
Marie Callenders Pie Shells are pre-made‚ deep-dish pastry crusts designed for convenience and quality․ Known for their flaky‚ golden texture‚ these shells are crafted to mimic homemade crusts․ They are ideal for both sweet and savory fillings‚ offering a consistent and delicious base for pies․ Popular among home bakers‚ they save time while delivering professional results․ The shells are versatile‚ fitting various recipes from classic pumpkin to hearty chicken pot pies‚ making them a favorite for any occasion․

Importance of Proper Instructions

Following proper instructions ensures Marie Callenders Pie Shells perform optimally․ Incorrect thawing or baking can lead to issues like shrinkage or sogginess‚ affecting both texture and presentation․ Adhering to guidelines helps maintain the crust’s flaky texture and golden color‚ delivering a professional finish․ Proper preparation also prevents common pitfalls‚ ensuring your pies turn out delicious and visually appealing every time․

Thawing and Preparation

Thawing and preparation are crucial steps to ensure the perfect texture and flavor of Marie Callenders Pie Shells․ Proper methods prevent crust shrinkage and sogginess․

Refrigerator Thawing Method

Thawing Marie Callenders Pie Shells in the refrigerator is the recommended method for optimal results․ Place the frozen shell in the fridge overnight or for 12-24 hours․ Keep it in its original packaging to prevent drying out․ Once thawed‚ the shell is ready to use for baking․ This method ensures the crust retains its flaky texture and buttery flavor‚ avoiding any risk of shrinkage during baking․

Room Temperature Thawing

Thawing Marie Callenders Pie Shells at room temperature is a convenient option for those short on time․ Place the shell in its original packaging on a flat surface․ Allow 2-3 hours for complete thawing․ Keep it away from direct sunlight to prevent overheating․ Once thawed‚ use immediately for best results․ While this method is quicker than refrigeration‚ it’s crucial to monitor the shell to avoid softening․ For optimal texture‚ the refrigerator method is preferred to prevent crust shrinkage during baking․

Baking Instructions

Preheat oven to 375°F․ Place pie shell on a baking sheet․ Bake for 12-15 minutes until golden․ For filled pies‚ bake until filling is set․

Baking from Frozen

Preheat oven to 375°F․ Place frozen pie shell on a baking sheet․ Bake for 12-15 minutes‚ or until golden․ No need to thaw first․ For filled pies‚ bake until filling is set․ Crust may shrink slightly․ Ensure oven is preheated fully for best results․ Some users prefer thawing first for better texture‚ but baking from frozen is convenient and yields a flaky crust․

Baking After Thawing

Preheat oven to 375°F․ Place thawed pie shell on a baking sheet․ Bake for 10-12 minutes until lightly golden․ For filled pies‚ bake until filling is set․ Crust may slightly shrink․ To prevent excessive browning‚ cover edges with foil if needed․ Ensure pie shell is fully thawed for even baking․ Some users prefer baking from frozen for convenience‚ but thawing first can yield a flakier crust․

Recommended Temperature and Time

Preheat your oven to 375°F for optimal baking results․ Bake frozen pie shells for 10-15 minutes or thawed shells for 8-12 minutes․ For filled pies‚ bake at 375°F for 20-25 minutes until the filling is set and the crust is golden․ Adjust time slightly if using convection baking․ Ensure the crust doesn’t overbrown by covering edges with foil if necessary․ Proper temperature and timing ensure a flaky‚ perfectly baked crust every time․

Filling and Customization

Marie Callenders Pie Shells offer endless customization options‚ from classic sweet fillings like chocolate and pumpkin to savory creations like chicken pot pie‚ ensuring versatility for any recipe․

Sweet Fillings

Marie Callenders Pie Shells are perfect for sweet treats like chocolate satin pie‚ pumpkin pie‚ or peach pie․ The flaky crust complements rich‚ creamy‚ or fruity fillings․ For a decadent dessert‚ try a chocolate cream pudding pie or a classic apple pie․ Simply bake the shell according to instructions‚ fill‚ and enjoy․ The shells’ golden‚ buttery flavor enhances any sweet creation‚ making them a versatile choice for desserts․

Savory Fillings

Marie Callenders Pie Shells are ideal for savory dishes like chicken pot pie‚ quiche‚ or steak pot pie․ The buttery‚ flaky crust pairs beautifully with hearty fillings such as tender chicken‚ creamy cheeses‚ or sautéed vegetables․ For a comforting meal‚ fill the shell with a rich‚ savory mixture and bake until golden․ The shells’ versatility makes them perfect for creating satisfying main dishes or appetizers with minimal effort․

Storage and Handling

Store Marie Callenders Pie Shells in the freezer or refrigerator to maintain freshness․ Freeze for up to 3 months or refrigerate for 1-2 days before use․

Storing Pie Shells Before Baking

Store Marie Callenders Pie Shells in the freezer at 0°F (-18°C) or below to maintain quality․ Keep them in their original packaging to prevent moisture and freezer burn․ If not using immediately‚ refrigerate at 40°F (4°C) for up to 2 days․ Always ensure the shells are sealed tightly to preserve freshness and prevent absorption of odors from other foods․

Storing Baked Pie Shells

Baked Marie Callenders Pie Shells can be stored at room temperature for up to 2 days in an airtight container․ For longer storage‚ place them in the refrigerator for up to 5 days․ Freeze cooled shells in a sealed container or plastic bag for up to 2 months․ Always ensure shells are completely cooled before storing to prevent moisture buildup and sogginess․

Troubleshooting Common Issues

Common issues with Marie Callenders Pie Shells include crust shrinkage and sogginess․ To address these‚ ensure proper thawing‚ avoid overfilling‚ and bake at the recommended temperature and time․

  • Crust Shrinkage: Prevent by not over-stretching the dough․
  • Soggy Crusts: Blind baking or pre-baking can help․

Preventing Crust Shrinkage

To prevent crust shrinkage‚ ensure Marie Callenders Pie Shells are properly thawed and chilled before use․ Avoid stretching the dough‚ as this can cause uneven baking․ Blind baking with pie weights can help maintain shape․ Always follow recommended baking temperatures and times․ If shrinkage occurs‚ gently press the crust back into place while warm․ Proper handling and adherence to instructions minimize this issue‚ ensuring a perfectly baked pie crust․

Avoiding Soggy Crusts

Avoiding Soggy Crusts

To avoid a soggy crust when using Marie Callenders Pie Shells‚ ensure proper preheating of the oven and bake at the recommended temperature․ Blind baking the crust before adding fillings can help prevent moisture absorption․ Use fillings with the right consistency and avoid overfilling․ Cooling the baked crust on a wire rack can also reduce sogginess․ Proper handling and adherence to baking instructions will ensure a crisp and golden crust every time․

Where to Buy Marie Callenders Pie Shells

Marie Callenders Pie Shells are widely available at major grocery stores‚ online retailers‚ and specialty food shops‚ offering convenient access for home bakers and chefs alike․

Online Retailers

Marie Callenders Pie Shells can be purchased from various online retailers‚ including Brookshire Brothers‚ New Brighton Foodland‚ and Sunset Foods․ Many offer convenient delivery or click-and-collect services‚ making it easy to stock up for your next baking project․

In-Store Availability

Marie Callenders Pie Shells are widely available in local grocery stores and supermarkets․ Stores such as Ukuras Big Dollar Store and Sunset Foods carry them‚ allowing customers to easily find and purchase the shells for their recipes․ This convenient in-store availability ensures that home bakers can quickly access the product without the need for online orders․

Recipe Ideas Using Pie Shells

Marie Callenders Pie Shells are perfect for creating delicious desserts and savory dishes․ Try making a classic pumpkin pie or a hearty chicken pot pie for a flavorful meal․

Classic Pumpkin Pie

A timeless dessert‚ the classic pumpkin pie is effortlessly elevated with Marie Callenders Pie Shells․ Simply fill the pre-made crust with a spiced pumpkin mixture‚ bake until set‚ and enjoy the perfect blend of warm spices and flaky crust․ This convenient option saves time while delivering a homemade taste‚ ideal for holidays or cozy gatherings․

Chicken Pot Pie

Marie Callenders Pie Shells make creating a hearty chicken pot pie effortless․ Fill the shell with tender white-meat chicken‚ cheddar cheese‚ broccoli‚ bacon‚ and a creamy filling․ Bake until golden and bubbly for a comforting meal․ The flaky crust complements the savory ingredients perfectly‚ offering a homemade taste without the hassle of making dough from scratch․

Comparisons with Other Brands

Taste and Texture Comparison

Marie Callenders Pie Shells stand out for their flaky‚ golden crust‚ offering a homemade taste that rivals other brands like Trader Joes and Pillsbury in quality and texture․

Marie Callenders Pie Shells are renowned for their flaky‚ golden crust‚ offering a homemade taste that rivals other brands․ The texture is tender yet crisp‚ with a buttery richness that enhances any filling․ Compared to brands like Pillsbury or Trader Joes‚ Marie Callenders stands out for its made-from-scratch quality‚ providing a more authentic pie experience․ However‚ some users find the crust slightly greasy‚ which may not appeal to everyone․

Convenience and Cost

Marie Callenders Pie Shells offer exceptional convenience‚ saving time on homemade crust preparation․ The pre-made shells are easy to thaw and bake‚ making them ideal for busy cooks․ While they are more affordable than making a crust from scratch‚ some users find them slightly pricier than other brands․ However‚ the quality and taste justify the cost for many‚ making them a worthwhile investment for perfect pies every time․

Marie Callenders Pie Shells are a reliable choice for creating delicious homemade pies with minimal effort․ Their flaky‚ made-from-scratch texture and easy preparation make them a favorite among both experienced bakers and novices․ Whether you’re making a sweet or savory pie‚ these shells offer consistent results and save valuable time‚ making them a great option for anyone looking to elevate their baking without the hassle of homemade crusts․

acts retreat manual pdf

The ACTS Retreat Manual is a comprehensive guide designed for priests, deacons, and lay leaders to facilitate transformative spiritual retreats. It provides essential information, guidelines, and resources to ensure a meaningful experience.

Foundational Principles of the ACTS Retreat

The ACTS Retreat is rooted in four core pillars—Adoration, Community, Theology, and Service—which provide the spiritual foundation for fostering a deeper connection with Christ and building vibrant faith communities.

Overview of the ACTS Retreat

The ACTS Retreat is a transformative, three-day Catholic lay retreat that focuses on fostering a deeper relationship with Jesus Christ. It is designed to inspire participants to live as intentional disciples of Christ, emphasizing spiritual growth, community building, and service to others. The retreat is rooted in the four pillars of Adoration, Community, Theology, and Service, which guide the structure and activities of the retreat. Through prayer, sacraments, teachings, and fellowship, participants experience a powerful encounter with Christ. The retreat is typically led by lay leaders and clergy, offering a supportive environment for spiritual renewal and reflection. The ultimate goal is to equip participants to live out their faith more fully in their daily lives, strengthening their parish communities and spreading the Gospel. This overview provides a foundational understanding of the retreat’s purpose and structure.

The Pillars of the ACTS Retreat

The ACTS Retreat is built on four foundational pillars: Adoration, Community, Theology, and Service. These pillars are the heart of the retreat, guiding participants toward a deeper relationship with Jesus Christ. Adoration focuses on prayer and worship, emphasizing a personal encounter with God. Community fosters unity and bonds among participants, creating a supportive environment for shared faith experiences. Theology provides spiritual teachings and reflections, deepening understanding of the Catholic faith. Finally, Service encourages participants to live out their faith through selfless acts, both during the retreat and in their daily lives. Together, these pillars create a holistic experience that nourishes the soul, strengthens faith, and inspires discipleship. They are the cornerstone of the ACTS Retreat, ensuring a balanced and transformative spiritual journey for all participants.

The ACTS Retreat Process

The ACTS Retreat Process is a structured journey guided by the ACTS Retreat Manual, ensuring a transformative experience through prayer, community, theology, and service. Leaders and teams collaborate to create a meaningful retreat.

Structure and Timeline of the Retreat

The ACTS Retreat is typically a three-day, three-night experience, beginning on Thursday evening and concluding on Sunday afternoon. The retreat follows a structured timeline outlined in the ACTS Retreat Manual, ensuring a balanced blend of prayer, reflection, and community-building activities. Thursday includes Team Mass or Prayer Service, followed by participant arrival and orientation. Friday focuses on Adoration, reconciliation, and spiritual talks, while Saturday emphasizes service and community. Sunday concludes with a closing Mass and commissioning ceremony. Key activities include prayer services, meals, small group sharing, and free time for personal reflection. The manual provides detailed scheduling and resources to guide leaders in facilitating a smooth and meaningful experience. This structured approach ensures participants can fully engage in the retreat’s spiritual and communal aspects, fostering a deep encounter with Christ and strengthening faith communities.

Key Activities and Events

The ACTS Retreat features a series of spiritual and communal activities designed to foster a deep encounter with Christ. Central to the retreat are prayer services, including Team Mass and Adoration, which set the tone for spiritual renewal. Meals and shared experiences create a sense of community, while talks by lay witnesses and clergy provide inspiration and guidance. Small group sharings, known as “family groups,” encourage participants to reflect on their faith journeys and share personal experiences. Additionally, reconciliation services and free time for personal prayer and reflection are integral to the retreat’s structure. The retreat culminates in a closing Mass and commissioning ceremony, sending participants back to their communities empowered to live as disciples of Christ. These activities, outlined in the ACTS Retreat Manual, ensure a holistic experience of prayer, service, and fellowship.

Resources and Appendices

The ACTS Retreat Manual includes a wealth of resources and appendices to support retreat planning and execution. These resources are designed to equip leaders with practical tools, ensuring a smooth and impactful experience. The manual features editable forms, such as registration templates, schedules, and evaluation forms, all aligned with the 2019 guidelines. Additionally, it provides sample letters, prayer services, and team training materials. The appendices also include a comprehensive toolkit for specific needs, such as the Teen ACTS Retreat Toolkit, tailored for youth programs. These resources are complemented by a detailed appendix section, offering guidance on retreat logistics, budgets, and troubleshooting common challenges. By adhering to the manual’s instructions and utilizing these resources, leaders can effectively facilitate a transformative experience for all participants. The ACTS Retreat Manual ensures that every aspect of the retreat is well-prepared and Spirit-led.

Leadership and Team Formation

The ACTS Retreat Manual emphasizes the importance of strong leadership and effective team formation in creating a successful retreat experience. It outlines clear roles, responsibilities, and training processes for all leaders and team members.

Leadership Roles and Responsibilities

The ACTS Retreat Manual outlines specific leadership roles and responsibilities to ensure the retreat’s success. Priests, deacons, and lay leaders are entrusted with guiding the spiritual and logistical aspects of the retreat. The Retreat Director oversees the entire process, while Team Leaders manage specific activities and small groups. Each role is defined to promote collaboration, accountability, and a focus on the retreat’s mission. The manual emphasizes the importance of prayer, communication, and unity among leaders to create a transformative experience for participants. Leaders are also responsible for preparing spiritually and logistically, ensuring all aspects of the retreat align with its core principles. Proper leadership ensures a smooth and impactful retreat, fostering a deeper connection with faith for all involved. The manual provides detailed guidelines to help leaders fulfill their duties effectively.

Team Formation and Training

The ACTS Retreat Manual emphasizes the importance of proper team formation and training to ensure a successful retreat. The manual provides detailed guidelines for forming a cohesive team, including the selection of leaders, assigning roles, and fostering unity among members. Training is a critical component, as it equips the team with the necessary skills and knowledge to effectively guide the retreat. The manual outlines a structured training process, which includes spiritual preparation, understanding the retreat’s pillars, and practical logistics. Team leaders are encouraged to use the manual as a resource to train their members, ensuring everyone is aligned with the retreat’s mission and goals. The manual also includes editable forms and checklists to assist in organizing and preparing for the retreat. Proper team formation and training are essential for creating a transformative and Spirit-filled experience for all participants. The manual serves as a comprehensive guide to help teams prepare effectively and confidently.

The ACTS Retreat Manual serves as a vital resource for creating transformative spiritual experiences, guiding leaders and participants alike. It emphasizes the importance of prayer, community, and service, fostering a deeper connection with Christ. By following the manual’s structured approach, retreats become meaningful encounters that inspire personal growth and faith renewal. The manual’s comprehensive guidelines ensure consistency and effectiveness, making it an indispensable tool for ACTS Retreat teams. Its focus on foundational principles, leadership roles, and practical logistics equips teams to create an environment conducive to spiritual awakening. As a concluding thought, the ACTS Retreat Manual is not just a guide but a catalyst for fostering a stronger, Spirit-filled community. It invites all participants to embrace the retreat’s mission and carry its lessons forward in their daily lives, strengthening their commitment to the Catholic faith.

electrical plan layout pdf

An electrical plan layout PDF is a detailed document illustrating the placement of electrical components, serving as a blueprint for safe and efficient electrical system installation and compliance.

1.1 Importance of Electrical Plan Layout

An electrical plan layout ensures safety, functionality, and compliance with regulations. It guides the installation of circuits, outlets, and lighting, preventing overloading and hazards. A well-designed layout optimizes power distribution, enhances energy efficiency, and supports future modifications. It serves as a clear blueprint for electricians, reducing errors and ensuring all components are correctly positioned. This plan is essential for maintaining reliability, aesthetics, and long-term system performance in residential and commercial settings.

1.2 Purpose of an Electrical Plan Layout PDF

The primary purpose of an electrical plan layout PDF is to provide a clear, scalable, and detailed visual representation of an electrical system. It outlines the placement of circuits, outlets, switches, and lighting fixtures, ensuring accurate installation. This document serves as a reference for electricians, contractors, and architects, facilitating compliance with safety standards and building codes. It also aids in troubleshooting and future system expansions, making it an indispensable tool for both new constructions and renovations.

Key Elements of an Electrical Plan Layout

An electrical plan layout includes essential components like symbols, circuits, and safety measures, ensuring clear communication of the system’s design for installation and maintenance purposes.

2.1 Electrical Symbols and Notations

Electrical symbols and notations are fundamental in creating clear and accurate layouts. They represent components like switches, outlets, and circuits, ensuring everyone involved understands the design; Standardized symbols, such as those for lighting fixtures, receptacles, and transformers, are used universally. Proper notation includes labels for each symbol, indicating their purpose and location. This consistency aids in avoiding errors during installation and maintenance, making the electrical plan layout both functional and reliable for all stakeholders.

2.2 Circuit Design and Load Distribution

Circuit design and load distribution are critical for ensuring efficient and safe electrical systems. Proper planning involves dividing the electrical system into dedicated circuits, each serving specific areas or loads. This prevents overloading and ensures even power distribution. Load calculations determine the required capacity, while circuit design considers voltage drop and wire sizing. Clear load schedules and single-line diagrams help visualize the system, ensuring compliance with safety standards and facilitating future modifications or upgrades.

2.3 Safety Measures in Electrical Layout

Safety is paramount in electrical layouts, ensuring systems are installed to prevent hazards. Key measures include proper grounding, surge protection, and circuit overcurrent devices. Arc fault protection and GFCI outlets mitigate fire and shock risks. Clear labeling of circuits and components aids emergency response. Regular inspections and adherence to local electrical codes ensure compliance and minimize risks, protecting both the system and its users from potential dangers.

Steps to Create an Electrical Plan Layout

Start by drawing the floor plan, then add electrical components and fixtures. Include annotations and labels for clarity. Ensure the layout is accurate and complies with standards.

3.1 Drawing the Floor Plan

Drawing the floor plan is the first step in creating an electrical layout. It involves sketching the building’s structure, including doors, windows, and walls. Use graph paper to ensure scale accuracy. Measure and mark room dimensions, outlets, switches, and lighting fixtures. This step provides a clear visual representation of the space, helping to plan electrical component placement effectively. Include annotations for clarity and reference. Accurate floor plan drawing ensures proper circuit distribution and compliance with electrical standards.

3.2 Adding Electrical Components and Fixtures

After drawing the floor plan, add electrical components and fixtures such as outlets, switches, lighting fixtures, and circuits. Place them according to the building’s intended use and safety standards. Use electrical symbols to represent each component clearly. Ensure proper spacing and alignment for functionality and aesthetics. Consider load distribution to avoid overloading circuits. Utilize software tools like RoomSketcher or AutoCAD for precision. Verify compliance with local electrical codes and review the layout for future adaptability and scalability.

3.3 Including Annotations and Labels

Add annotations and labels to provide clarity and detail in the electrical plan. Include notes, labels, and legends to explain symbols, circuits, and component functions. Use callouts to highlight specific details or safety measures. Ensure all annotations are concise and positioned neatly to avoid clutter. Labels should be clear and legible, indicating the purpose of each fixture and circuit. This step ensures the layout is easily understandable and functional, aiding in installation and future maintenance.

Best Practices for Electrical Plan Layout

  • Use appropriate scale and measurements for accuracy.
  • Implement color-coding to differentiate components and improve clarity.
  • Consult professionals to ensure compliance with electrical standards.

4.1 Using Appropriate Scale and Measurements

Using the correct scale ensures the electrical layout accurately represents the actual space. Proper measurements guarantee components fit as planned, preventing overcrowding and ensuring safe distances. Consistency in scaling across the document aids in clear communication among contractors and electricians, reducing errors. Always verify measurements against the physical space to maintain precision and functionality in the electrical plan layout PDF.

4.2 Implementing Color-Coding for Clarity

Color-coding in electrical plan layouts enhances clarity by differentiating components, circuits, and systems. Using distinct colors for lighting, power, and communication systems simplifies identification. This approach reduces errors and improves readability, especially in complex layouts. Consistent color schemes ensure uniformity, making it easier for contractors and electricians to understand the plan quickly. Color-coding also highlights safety features and critical pathways, ensuring compliance with electrical standards and best practices.

4.3 Consulting with Professionals

Consulting with licensed electricians and engineers ensures compliance with electrical codes and safety standards. They offer expertise in load distribution, circuit design, and safety measures, minimizing risks. Professionals review plans for accuracy, optimizing system performance and future scalability. Their input is crucial for complex projects, ensuring all components are correctly integrated. Collaborating with experts guarantees a well-designed, efficient, and safe electrical layout, adhering to industry best practices and local regulations.

How to Read and Interpret an Electrical Plan Layout PDF

Understanding electrical symbols, circuits, and loads is key to interpreting the layout. Identifying components ensures safety and compliance, making the plan accurate and reliable for installations.

5.1 Understanding Electrical Symbols and Circuits

Understanding electrical symbols and circuits is crucial for interpreting a layout PDF. Symbols represent components like outlets, switches, and circuits, ensuring clear communication. Familiarity with circuit types, such as radial or ring, helps in identifying power distribution. Accurate interpretation ensures safety and compliance, making the plan reliable for installations and future modifications. This knowledge is essential for both professionals and DIYers to avoid errors and hazards.

5.2 Identifying Load Schedules and Single-Line Diagrams

Load schedules and single-line diagrams are essential components of an electrical plan layout PDF. Load schedules list power requirements for each component, ensuring proper load distribution. Single-line diagrams simplify complex systems, showing connections and circuits in a streamlined format. These tools help identify potential overloads and ensure compliance with safety standards. They are vital for electricians and DIYers to understand the system’s structure and plan modifications effectively.

5.3 Ensuring Compliance with Electrical Standards

Ensuring compliance with electrical standards is critical for safety and functionality. Electrical plans must adhere to local and international codes, such as IEEE or NEC standards. This involves proper circuit labeling, load calculations, and safety measures. Compliance ensures systems operate efficiently and safely, reducing risks of overloads or hazards. Regular reviews and updates to the plan are essential to maintain adherence to evolving standards and regulations. This step is vital for both residential and commercial electrical installations. Accurate documentation is key to meeting compliance requirements effectively.

Resources for Creating Electrical Plan Layout PDF

Explore resources for creating electrical plan layouts, including software tools, free templates, and online tutorials to streamline your design process effectively.

6.1 Free Templates and Examples

Free electrical plan templates and examples are widely available online, offering customizable layouts for various projects. Tools like RoomSketcher, SmartDraw, and AutoCAD provide pre-designed templates to streamline your workflow. These resources include libraries of electrical symbols, lighting plans, and circuit diagrams, enabling you to create professional-grade layouts quickly. Additionally, websites like EdrawMax and Template.net offer downloadable PDF templates tailored for different settings, from residential homes to commercial buildings.

6.2 Software Tools for Designing Electrical Layouts

Software tools like AutoCAD, RoomSketcher, and SmartDraw simplify the creation of electrical layouts. These tools offer libraries of electrical symbols, templates, and features for designing circuits and systems. RoomSketcher provides 2D and 3D views, while SmartDraw includes automation for generating diagrams from data. EdrawMax and SketchUp also support detailed electrical plan creation. These tools enable precise scaling, color-coding, and real-time collaboration, making it easier to produce professional-grade electrical layouts efficiently.

6.3 Online Courses and Tutorials

Online courses and tutorials provide comprehensive training on creating electrical plan layouts. Platforms like Udemy and Coursera offer courses on AutoCAD and electrical design. YouTube channels and forums share step-by-step guides for using tools like RoomSketcher and SketchUp. These resources cover basics like adding electrical symbols and annotations to advanced topics like circuit design and safety compliance. They are ideal for beginners and professionals seeking to enhance their skills in electrical plan layout creation.

cataclysm tailoring guide

Welcome to the Cataclysm Tailoring Guide! Learn how to master the art of tailoring, from leveling your skill to 525, crafting powerful gear, and maximizing your gold-making potential in WoW.

Tailoring in Cataclysm is a versatile profession that allows players to craft cloth gear, bags, and other essential items. It is particularly useful for classes like Mages, Priests, and Warlocks, who rely heavily on cloth armor. Tailors can create a wide range of items, from basic cloth armor to high-end raid gear, making it a valuable profession for both personal use and gold-making. The profession also offers unique bonuses, such as the ability to craft Dreamcloth, a rare and highly sought-after material. Additionally, Tailors can enchant their own gear with special Spellthread leg enchants, providing a competitive edge in raids and PvP. This guide will walk you through the ins and outs of Cataclysm Tailoring, helping you master the craft and unlock its full potential.

Leveling Your Tailoring Skill from 1 to 525

Mastering Tailoring from 1 to 525 requires patience and efficient material use. Focus on crafting patterns that grant skill points consistently, ensuring a smooth progression to max level.

Best Materials for Leveling Tailoring Efficiently

To level Tailoring efficiently, gather essential materials like Embersilk Cloth, Mageweave Cloth, and Bolts of Silk Cloth. Stock up on dyes such as Blue Dye and Red Dye, along with Fine Thread and Silken Thread. These items are crucial for crafting patterns that provide consistent skill gains. Farming cloth from dungeons or purchasing from the Auction House ensures a steady supply. Additionally, materials like Volatile Fire, Volatile Water, and Embercloth are needed for higher-level recipes. Plan ahead by acquiring these materials in bulk to avoid delays. Using cooldowns like Dreamcloth crafting can also provide valuable resources. Efficient material management ensures a smooth journey from 1 to 525.

Fastest Route to Reach 525 Tailoring

To reach 525 Tailoring quickly, focus on crafting items with high skill gains. Start with Embersilk Cloth and Mageweave Cloth, which are versatile for early patterns. Use Bolts of Silk Cloth and Fine Thread for crafting bags and gear. Once you reach higher levels, switch to Dreamcloth recipes, which require Volatile Fire, Water, and Air. Don’t forget to use your weekly Dreamcloth cooldown for consistent progress. Farming materials or buying from the Auction House ensures you never run out of supplies. Combine these strategies with the recommended material guide for the fastest route to 525. Efficient crafting and planning are key to minimizing time and maximizing skill gains in Cataclysm Tailoring.

Crafting High-End Cataclysm Tailoring Items

Master crafting epic gear like Dreamcloth items and powerful raid and PvP equipment. Use rare materials to create high-demand pieces that dominate the in-game market and enhance your character’s performance significantly.

Crafting Epic Gear for Raid and PvP

Crafting epic gear in Cataclysm tailoring is essential for raid and PvP success. Use rare materials like Dreamcloth to create powerful items such as Empowered Spellthread pants and Masters Spellthread robes. These items provide significant stat boosts, making them highly sought after by players. Tailors can craft gear with unique enchants, such as Master’s Spellthread, which offers spell power and intellect, crucial for casters. Additionally, Empowered Spellthread provides stamina and spell power, making it ideal for healers and tanks. These recipes often require high-level materials like Bolt of Embersilk and volatile elements, ensuring that crafted items are both rare and valuable. By focusing on these high-end recipes, tailors can create gear that stands out in both raid and PvP environments, enhancing their characters’ performance and earning substantial gold from sales.

Mastering Dreamcloth Recipes

Mastering Dreamcloth recipes is a cornerstone of high-end Cataclysm tailoring. This rare and valuable cloth is crafted using 5 Bolt of Embersilk and 30 of one volatile (Fire, Water, Air, or Earth). Each Dreamcloth recipe has a weekly cooldown, allowing tailors to craft only 5 pieces per week. This exclusivity makes Dreamcloth highly sought after for crafting epic gear like robes, pants, and cloaks. To maximize efficiency, focus on recipes with the highest demand, such as those granting stamina or spell power. Tailors can also use Dreamcloth to create powerful enchants like Empowered Spellthread. With proper planning and cooldown management, mastering Dreamcloth recipes can elevate your tailoring to new heights, both in terms of gear quality and gold-making potential.

Maximizing Gold Making with Tailoring

Maximize your gold-making potential with Cataclysm tailoring by crafting high-demand items like Dreamcloth and epic gear. Utilize daily cooldowns and exploit market trends for optimal profit. Learn how to craft and sell efficiently to dominate the Auction House and increase your gold income through tailored strategies and recipes.

Daily Cooldowns and Profitable Recipes

Mastering daily cooldowns is essential for maximizing gold-making with Cataclysm tailoring. Tailors can craft Dreamcloth, a highly sought-after material, using weekly cooldown recipes that require 8 Bolt of Embersilk and 30 of one volatile. This makes it a lucrative item for raid and PvP gear. Additionally, crafting epic gear like cloaks and leg enchants can yield significant profits. Focus on recipes with high demand, such as Spellthreads and bags, which are always in demand. To optimize, use materials efficiently and monitor the auction house to identify gaps in the market. By leveraging these cooldowns and recipes, tailors can consistently generate gold and stay competitive in the in-game economy. This approach ensures steady income and maximizes the potential of the tailoring profession in Cataclysm Classic.

Exploiting Market Demand for Tailored Items

Understanding market demand is crucial for maximizing profits with Cataclysm tailoring. Focus on crafting items that are consistently in high demand, such as bags, epic gear, and enchanting materials. Dreamcloth, crafted from weekly cooldown recipes, is highly sought after for raid and PvP items. Additionally, tailors can capitalize on the need for Spellthreads and other unique enchants. Monitor the auction house to identify gaps in supply and adjust your crafting schedule accordingly. High-demand items like cloaks and leg enchants often sell quickly, especially during raid progression phases. By staying attuned to server economics and player needs, tailors can exploit market trends to generate consistent gold. This approach ensures that your crafted items remain profitable and in demand throughout the expansion. Adaptability is key to thriving in the competitive market of Cataclysm Classic.

Final Tips for Mastering Cataclysm Tailoring

Mastering Cataclysm tailoring requires patience and strategy. Always keep an eye on market demand to maximize gold-making opportunities. Regularly check the auction house to identify high-demand items. Focus on crafting epic gear and dreamcloth for raiders and PvPers, as these items often yield the highest profits. Use your daily cooldowns wisely, especially for crafting dreamcloth, which requires bolts of embersilk and volatiles. Additionally, consider specializing in specific types of gear, such as cloth or bags, to cater to niche markets. Join guilds or communities to gain insights and stay updated on the latest trends. Lastly, don’t hesitate to invest in materials early to avoid shortages during crafting sessions. With dedication and smart planning, you’ll become a top-tier tailor in no time!

teaching strategies objectives pdf

Effective teaching strategies and clear learning objectives are essential for fostering student engagement and achieving educational goals․ They guide instruction, align with curriculum standards, and promote evidence-based practices to ensure student success and continuous improvement in the educational process․

Overview of the Teaching Cycle

The teaching cycle consists of four phases: Engage, Instruct, Apply, and Assess․ Each phase incorporates specific teaching strategies to enhance student learning․ Engagement techniques capture attention, while instructional delivery methods convey content․ Application involves hands-on activities, and assessment evaluates understanding․ This structured approach ensures alignment between strategies and objectives, fostering a systematic and goal-oriented educational process․ Continuous improvement is achieved through ongoing evaluation and adjustment of these phases․

Importance of Aligning Strategies with Learning Objectives

Aligning teaching strategies with learning objectives ensures clarity and focus in instruction, enabling students to achieve specific outcomes․ Clear objectives guide the selection of appropriate methods, making lessons more effective․ This alignment also helps in assessing whether learning goals have been met, ensuring accountability and continuous improvement․ By integrating strategies with objectives, educators create a structured and purposeful learning environment that promotes student success and fosters a deeper understanding of the subject matter․

Key Components of Effective Teaching Strategies

Effective teaching strategies involve engagement techniques, instructional delivery methods, assessment mechanisms, and adaptability to diverse learners, ensuring a comprehensive approach to meet educational objectives and student needs․

Engagement Techniques

Engagement techniques are crucial for capturing students’ interest and fostering active participation in learning․ These methods include interactive activities, group discussions, hands-on exercises, and technology integration․ By incorporating real-world applications and personalized learning experiences, teachers can motivate students to take ownership of their education․ Effective use of multimedia tools, collaborative projects, and formative assessments also enhances engagement․ Aligning these techniques with clear learning objectives ensures that students remain focused and committed to achieving educational goals, while fostering critical thinking and creativity․

Instructional Delivery Methods

Instructional delivery methods are diverse approaches teachers use to present content effectively․ These include traditional lectures, flipped classrooms, and project-based learning․ Utilizing interactive whiteboards, educational apps, and multimedia resources enhances delivery․ Differentiated instruction and scaffolding cater to diverse learners, ensuring all students can access the curriculum․ teachers can adapt their methods to align with learning objectives, fostering engagement and understanding․ The choice of method depends on classroom dynamics, subject matter, and student needs, ensuring a tailored approach to meet educational goals and promote student success․

Assessment and Feedback Mechanisms

Assessment and feedback mechanisms are crucial for evaluating student progress and informing instructional strategies․ Formative assessments, such as quizzes and class discussions, provide ongoing insights, while summative assessments measure learning at the end of a unit․ Feedback should be constructive, highlighting strengths and areas for improvement․ Leveraging data from assessments helps teachers adjust instruction and personalize learning experiences․ Regular feedback loops ensure students stay aligned with learning objectives, fostering growth and understanding throughout the educational process․

Setting Clear Learning Objectives

Clear learning objectives guide instruction, align with curriculum standards, and ensure evidence-based practices․ They help students understand expectations and focus efforts, improving overall educational outcomes and success․

SMART Goals for Student Learning

SMART goals are Specific, Measurable, Achievable, Relevant, and Time-bound, ensuring clarity and focus for student learning․ They help students understand expectations and track progress․ By aligning with curriculum standards, SMART goals promote evidence-based teaching strategies and continuous improvement․ Teachers can set core objectives and allow personalization, fostering engagement and accountability․ Regular assessments and feedback ensure goals are met, guiding instruction and enhancing overall educational outcomes effectively․

Aligning Objectives with Curriculum Standards

Aligning teaching objectives with curriculum standards ensures coherence and relevance in instruction․ This alignment guarantees that learning activities and assessments directly address required outcomes․ By integrating standards, educators create a structured framework that guides lesson planning and delivery․ This approach supports accountability, as it ensures students meet established benchmarks․ Aligning objectives also facilitates the use of evidence-based teaching strategies, promoting a focused and effective learning environment that prepares students for future challenges and fosters continuous educational improvement․

Evidence-Based Teaching Practices

Evidence-based teaching practices involve using research-backed strategies to enhance student learning․ These methods, supported by data, ensure effective instruction and measurable improvements in educational outcomes consistently․

Instructional Strategies for Diverse Learners

Instructional strategies for diverse learners focus on meeting the unique needs of all students, including those with varying abilities, cultures, and learning styles․ Teachers can employ differentiated instruction, universal design for learning (UDL), and culturally responsive teaching to create inclusive classrooms․ These approaches ensure that each student has access to engaging and meaningful learning experiences tailored to their individual requirements, fostering academic success and social-emotional growth․ By incorporating flexible grouping, technology integration, and scaffolded instruction, educators can address the diverse needs of their students effectively․

Classroom Management and Student Engagement

Effective classroom management and student engagement are critical for creating a productive learning environment․ Teachers can use evidence-based strategies such as positive reinforcement, clear expectations, and interactive activities to maintain focus and motivation․ Building strong relationships with students and incorporating student-centered approaches fosters engagement and accountability․ By leveraging technology and hands-on learning tools, educators can cater to diverse learning needs, ensuring all students remain active participants in the educational process and achieve their full potential․

Interactive and Innovative Teaching Methods

Interactive and innovative teaching methods, such as group work, hands-on activities, and technology integration, foster engagement and deeper understanding, aligning with educational objectives for student success․

Group Work and Collaborative Learning

Group work and collaborative learning foster engagement, critical thinking, and teamwork․ These strategies encourage students to share ideas, solve problems collectively, and develop social-emotional skills․ By aligning group activities with learning objectives, teachers ensure that students achieve specific outcomes, such as improved communication and problem-solving abilities․ Collaborative learning also supports diverse learners by allowing peers to contribute strengths and learn from one another․ Regular feedback and assessment help measure progress and refine these interactive teaching methods for optimal effectiveness in the classroom․

Hands-On Activities and Project-Based Learning

Hands-on activities and project-based learning engage students through practical experiences, fostering deeper understanding and application of concepts․ These strategies align with learning objectives, encouraging critical thinking, creativity, and problem-solving․ Projects allow students to explore real-world issues, developing skills like collaboration and time management․ Teachers can differentiate instruction by tailoring activities to diverse learners, ensuring all students participate meaningfully․ Assessing project outcomes and presentations provides insights into student progress, making these methods invaluable for achieving educational goals and preparing students for future challenges․

Assessment and Evaluation of Teaching Effectiveness

Assessment and evaluation measure student learning outcomes and teaching impact, using formative and summative methods to refine strategies and ensure alignment with educational objectives and continuous improvement․

Formative vs․ Summative Assessment

Formative assessment monitors student progress during learning, providing timely feedback to adjust teaching strategies and improve outcomes․ Summative assessment evaluates student learning at the end of a lesson, unit, or course to measure mastery of objectives․ Both are crucial for alignment with educational goals, ensuring continuous improvement and data-driven instruction․ Formative assessments are informal and ongoing, while summative assessments are formal and often high-stakes, helping teachers and students gauge achievement and inform future instruction effectively․

Data-Driven Instruction and Continuous Improvement

Data-driven instruction involves using assessment results and learning analytics to guide teaching strategies and improve student outcomes․ By analyzing performance data, educators can identify gaps, adjust instruction, and implement targeted interventions․ Continuous improvement is achieved through ongoing evaluation of teaching methods and alignment with learning objectives․ This approach ensures that instructional practices remain effective, adaptive, and focused on enhancing student achievement, fostering a culture of data-informed decision-making to optimize educational outcomes and teaching effectiveness consistently over time․

Best Practices for Implementing Teaching Strategies

Aligning teaching strategies with learning objectives ensures focused instruction and measurable outcomes․ Use evidence-based methods, such as interactive activities and hands-on learning, to engage students․ Incorporate technology tools like educational apps and interactive whiteboards to enhance lessons․ Provide timely feedback and scaffold complex concepts to support diverse learners․ Reflect on teaching practices and adapt strategies based on student needs and performance data․ Continuous improvement ensures effective implementation of teaching strategies, fostering a dynamic and inclusive learning environment․

Future Trends in Educational Objectives and Strategies

Future trends emphasize technology integration, personalized learning, and real-world application of skills․ Adaptive learning tools and AI-driven platforms will tailor instruction to individual needs, enhancing engagement and outcomes․ Collaborative and project-based approaches will gain prominence, fostering critical thinking and problem-solving․ Educators will focus on developing social-emotional skills and cultural competence to prepare students for global challenges․ Continuous professional development for teachers will ensure they adapt to evolving educational demands, leveraging evidence-based strategies to create resilient and innovative learning environments for future generations․

nikon d3100 instruction manual

The Nikon D3100 is an entry-level DSLR camera featuring a 14․2MP CMOS sensor, HD video recording, and an innovative Guide Mode for beginners․ Nikon D3100 offers excellent image quality and ease of use․

1․1 Key Features of the Nikon D3100

The Nikon D3100 features a 14․2MP CMOS sensor, delivering crisp images with vibrant colors․ It includes Full HD 1080p video recording at 24fps, perfect for capturing life’s moments․ The camera boasts an 11-point autofocus system for precise subject tracking and a 3-inch LCD screen for easy previewing․ With an ISO range of 100-6400, it performs well in various lighting conditions․ The Guide Mode simplifies settings for beginners, while advanced modes like PASM offer creative control․

1․2 Target Audience and Usage Scenarios

The Nikon D3100 is designed for photography enthusiasts seeking to enhance their skills․ It’s ideal for beginners transitioning from compact cameras to DSLRs․ Perfect for capturing family moments, vacations, and creative projects․ The camera excels in various scenarios, including portraits, landscapes, and indoor events․ Its portability and ease of use make it suitable for travel and everyday photography․

Understanding the Camera Components

The Nikon D3100 features a 14․2MP CMOS sensor and EXPEED 2 image processor, delivering sharp images and enhanced performance․ Key components include the lens mount, LCD screen, and shutter button․

2․1 External Controls and Layout

The Nikon D3100 features an intuitive layout designed for easy access to key functions․ The mode dial on top allows quick selection of shooting modes, including Auto, P, S, A, M, and Guide Mode․ The shutter button is located on the top right, alongside the live view button for video recording and playback․ Navigation buttons on the rear enable menu browsing, while the LCD screen provides clear previews and settings adjustments․ Dedicated buttons for ISO, autofocus, and flash ensure quick adjustments․ The ergonomic design makes the camera comfortable to hold and operate․

2․2 Internal Components and Sensors

The Nikon D3100 is equipped with a high-performance 14․2MP CMOS sensor, delivering sharp images and excellent low-light performance․ The camera features an EXPEED 2 image processor, enhancing image quality and processing speed․ Its 11-point autofocus system ensures precise subject tracking, while the metering sensor provides accurate exposure control․ The sensor also supports a wide ISO range (100-12,800), reducing noise in challenging lighting conditions․ These internal components work together to optimize image capture and overall camera functionality․

Setting Up the Camera

Start by inserting the battery and memory card, then mount the lens․ Power on the camera, set the language, date, and time․ Complete initial setup․

3․1 Inserting the Battery and Memory Card

Open the battery compartment on the bottom of the camera․ Insert the EN-EL12 battery, ensuring the terminal contacts align․ Close the compartment securely․ Next, locate the memory card slot on the right side․ Insert the SD card with the label facing outward, gently pushing until it clicks․ Always use compatible cards for optimal performance․ This setup ensures your camera is ready for operation․

3․2 Mounting the Lens and Basic Accessories

To mount a lens, align the white dots on the camera and lens․ Gently turn the lens clockwise until it clicks․ For accessories, attach the neck strap to the camera’s eyelets․ Use the lens hood to reduce glare and protect the lens․ Ensure all accessories are compatible with the Nikon D3100 for proper functionality․ This setup enhances shooting comfort and image quality․

3․3 Initial Setup and Firmware Update

After inserting the battery and memory card, turn on the camera and follow the on-screen instructions to set the language, date, and time․ Navigate to the menu to adjust additional settings like AF modes or metering options․ For firmware updates, connect the camera to a computer via USB or use a memory card with the update file․ Ensure the battery is fully charged and follow on-screen prompts carefully to complete the update․ This ensures optimal performance and access to the latest features․

Basic Camera Modes

The Nikon D3100 offers multiple shooting modes to suit various photography needs․ Auto Mode simplifies photography for beginners, while Program Mode (P) provides flexibility․ Shutter Priority (S) and Aperture Priority (A) allow manual control over specific settings, and Manual (M) enables full customization for advanced users․

4․1 Auto Mode for Beginners

The Auto Mode on the Nikon D3100 is designed for ease of use, ideal for beginners․ The camera automatically adjusts settings like exposure, focus, and ISO for optimal results․ Users simply frame the shot and press the shutter; This mode is perfect for those new to photography, allowing them to capture high-quality images without manual adjustments․ The Guide Mode further assists by explaining camera functions and offering shooting tips․ Additionally, the camera includes built-in flash and scene detection for enhanced versatility․

4․2 Program Mode (P)

The Program Mode (P) on the Nikon D3100 offers a balance between simplicity and control․ The camera automatically sets aperture and shutter speed, but users can adjust ISO, white balance, and other settings for creative input․ This mode is ideal for photographers who want to explore beyond Auto Mode while still relying on the camera for basic exposure calculations․ It’s versatile and suitable for various shooting conditions, making it a great stepping stone for learning manual controls․

4․3 Shutter Priority Mode (S)

In Shutter Priority Mode (S), you set the shutter speed, and the camera automatically adjusts the aperture to ensure proper exposure․ This mode is ideal for controlling motion effects, such as freezing fast-moving subjects or creating blur․ Users can experiment with speeds from 1/4000s to 30s․ It’s perfect for sports, wildlife, or artistic photography․ Adjusting the ISO helps achieve the desired exposure, and using a tripod is recommended for slower speeds to avoid camera shake․

4․4 Aperture Priority Mode (A)

In Aperture Priority Mode (A), you control the aperture (f-stop), and the camera automatically adjusts the shutter speed․ This mode is perfect for managing depth of field, allowing you to blur backgrounds or keep entire scenes sharp․ Adjust the aperture to suit your creative vision, with options ranging from f/1․8 to f/32 (depending on the lens)․ Use it for portraits, landscapes, or macro photography․ Monitor the ISO to ensure optimal exposure, and consider using a tripod for low-light shots․

4․5 Manual Mode (M)

In Manual Mode (M), you have full control over aperture, shutter speed, and ISO, allowing for precise adjustments to achieve your desired exposure․ This mode is ideal for experienced photographers who want complete creative control․ Use the exposure meter as a guide to balance settings, and adjust the aperture (f-stop) and shutter speed to suit your artistic vision․ Experiment with low-light scenarios, long exposures, or unique depth-of-field effects․ Manual Mode is perfect for mastering advanced techniques and expressing your photography style․

Advanced Shooting Techniques

Master advanced methods like panoramic stitching and low-light photography to elevate your imaging․ Use external lighting and composition techniques for professional-grade results, enhancing your creative vision․

5․1 Understanding ISO Sensitivity

ISO sensitivity in the Nikon D3100 adjusts the camera’s light sensitivity, with a range of 100 to 12,800․ Lower ISOs (100-400) are ideal for bright conditions, minimizing grain and ensuring sharp images․ Higher ISOs (800-6400) are best for low-light scenarios, capturing images without a flash․ Be cautious, as high ISOs can introduce noise, degrading quality․ For optimal results, use the lowest necessary ISO and adjust based on lighting conditions․

5․2 White Balance Settings

White balance adjusts the color temperature to match lighting conditions, ensuring accurate colors․ The Nikon D3100 offers modes like Auto, Daylight, Shade, Tungsten, Fluorescent, and custom presets․ Auto mode automatically detects the light source, while manual settings provide precise control for specific environments․ Correct white balance enhances image quality by eliminating unwanted color casts and ensuring natural hues in various lighting scenarios․ Use this feature to optimize your shots for professional results․

5․3 Autofocus Modes and Metering

The Nikon D3100 features Single-Servo AF for stationary subjects, Continuous-Servo AF for moving subjects, and Manual Focus for precise control․ The camera also offers advanced metering modes, including 3D Color Matrix Metering II, Center-Weighted Metering, and Spot Metering․ These modes ensure accurate exposure by analyzing light distribution, making it ideal for various lighting conditions․ Combining autofocus and metering modes enhances composition and image quality for professional-grade photography․

Customization and Settings

The Nikon D3100 allows customization of camera controls to suit personal preferences․ Users can adjust image quality settings, such as resolution and compression, and builtin flash settings for optimal lighting․

6․1 Customizing Camera Controls

The Nikon D3100 allows users to customize camera controls for personalized shooting experiences․ Through the menu system, photographers can assign specific functions to buttons, such as ISO, autofocus, or white balance, streamlining workflow․ This feature enhances efficiency and comfort, enabling quick access to frequently used settings․ Customization options also include adjusting metering modes and AE-L/AF-L button functions, ensuring the camera adapts to individual preferences and shooting styles․

6․2 Managing Image Quality and Size

The Nikon D3100 allows users to adjust image quality and size to suit their needs․ Settings include Fine, Normal, and Basic quality options, which affect compression levels and file size․ Image size can be set to Large, Medium, or Small, offering resolutions like 4608×3072 pixels for high-quality prints or smaller sizes for web sharing․ Additionally, the camera supports NEF (RAW) format for uncompressed images, ideal for advanced post-processing․

6․3 Using the Built-in Flash

The Nikon D3100 features a built-in flash for low-light conditions․ It offers modes like Auto, Red-Eye Reduction, Slow Sync, and Rear-Curtain Sync․ To activate, press the flash button on the camera’s front․ The flash automatically adjusts power based on lighting, but manual adjustment is also possible․ Use the Flash Compensation feature to fine-tune brightness․ Ensure the flash is charged before shooting and avoid obstruction for optimal results․

Video Recording and Playback

The Nikon D3100 supports HD video recording up to 1080p at 24fps․ Activate D-Movie Mode via the Live View button․ Preview and playback clips on the LCD monitor․

7․1 Recording HD Video

The Nikon D3100 allows HD video recording in 1080p (24fps) and 720p (30fps) resolutions․ Activate D-Movie Mode by pressing the Live View button․ Use the Movie Settings menu to select resolution and frame rate․ Stabilize the camera with a tripod for smooth footage․ Ensure proper lighting for optimal results․ Videos are saved in MOV format․ Maximum recording time per clip is 10 minutes for 1080p and 20 minutes for 720p due to file size limits․

7․2 Playback and Basic Editing

After recording, review your videos and photos on the Nikon D3100’s 3-inch LCD screen․ Use the Playback button to view clips or scroll through images․ Basic editing options include trimming video clips directly on the camera via the Playback Menu․ Delete unwanted clips or protect favorites․ The camera also allows adding date stamps and basic metadata․ For advanced editing, transfer files to a computer using the MOV format․

Advanced Features

The Nikon D3100 unlocks advanced photography potential with features like Live View, Face Detection, and Continuous Shooting․ Use Bracketing for perfect exposure control in challenging lighting conditions․

8․1 Live View and Face Detection

The Nikon D3100 features Live View, enabling real-time preview of shots on its 3-inch LCD screen․ This mode is ideal for precise focus and composition․ Face Detection automatically identifies and focuses on human faces, optimizing portraits․ Users can select multiple faces or adjust exposure for better results․ Live View also supports Subject Tracking, keeping moving subjects sharp․ These features enhance creativity and simplify capturing stunning images․

8․2 Continuous Shooting and Bracketing

The Nikon D3100 supports Continuous Shooting Mode, capturing up to 3 frames per second․ This feature is ideal for action or wildlife photography․ Bracketing allows capturing multiple shots at different exposures, merged later for HDR․ Users can bracket up to 3 frames, adjusting exposure compensation․ These modes enhance dynamic range and offer flexibility in challenging lighting conditions, making the D3100 versatile for various photography needs․

8․3 Using External Flash and Accessories

The Nikon D3100 supports external flashes via its hot shoe mount, enabling advanced lighting control․ Compatible with Nikon’s Creative Lighting System, it works seamlessly with flashes like the SB-400 and SB-700․ External flashes enhance low-light performance and reduce redeye․ Additional accessories, such as remote controls and GPS units, expand the camera’s functionality․ These tools help photographers achieve professional results and adapt to various shooting scenarios․

Maintenance and Troubleshooting

Regularly clean the sensor and lens to prevent dust buildup․ Update firmware for optimal performance․ Check battery health and address error messages promptly for smooth operation․

9․1 Cleaning the Sensor and Lens

Regular cleaning ensures optimal image quality․ Use a soft, dry microfiber cloth for the lens and viewfinder․ For the sensor, activate Mirror Lock-Up mode and gently blow with a rubber blower․ Avoid touching the sensor surface․ Clean the lens regularly to prevent smudges and fingerprints․ Never use liquids or harsh chemicals, as they may damage coatings․ Proper maintenance prolongs the camera’s performance and image clarity․

9․2 Common Issues and Solutions

The Nikon D3100 may experience issues like blurry images or memory card errors․ For blurry photos, ensure autofocus is enabled and clean the lens․ If the memory card fails, format it or replace it․ Battery life concerns can be resolved by using genuine batteries and updating firmware․ For error messages, restart the camera or reset settings․ Regular maintenance and firmware updates help prevent issues․ Always refer to the manual for troubleshooting guides․

cindy trimm warfare prayer pdf

Cindy Trimm‚ a renowned prayer warrior and teacher‚ specializes in spiritual warfare‚ empowering believers to overcome life’s challenges through prayer. Her “Warfare Prayer” PDF offers practical tools and strategies for victorious living‚ helping individuals transform their mindset and equipping them for spiritual battles.

Background of Cindy Trimm and Her Ministry

Cindy Trimm is a globally recognized prayer warrior‚ teacher‚ and author dedicated to empowering believers in spiritual warfare. Her ministry focuses on equipping individuals with tools to overcome life’s challenges through prayer. Known for her powerful teachings‚ Trimm has authored books like Commanding Your Morning and Warfare Prayer‚ which emphasize spiritual authority and victory. Her work has inspired millions to embrace prayer as a weapon for transformation and to live a purpose-driven life. Trimm’s teachings highlight the importance of mindset transformation and daily empowerment.

Purpose and Overview of the “Warfare Prayer” PDF

The “Warfare Prayer” PDF by Cindy Trimm is designed to equip believers with strategic tools for effective spiritual warfare. It provides insights into biblical principles‚ powerful declarations‚ and prayer strategies to overcome life’s challenges. The guide emphasizes the importance of prayer in gaining victory and transforming one’s life. By focusing on spiritual authority and empowerment‚ the PDF helps readers align their prayers with God’s promises‚ ensuring they live a life of purpose‚ joy‚ and fulfillment. It serves as a practical handbook for those seeking to deepen their prayer life and spiritual influence.

Key Concepts in Cindy Trimm’s Warfare Prayer

Cindy Trimm’s Warfare Prayer emphasizes strategic prayer‚ declarations‚ and spiritual authority‚ empowering believers to overcome challenges and achieve victory in their spiritual lives.

Foundational Principles of Spiritual Warfare

Spiritual warfare is rooted in the recognition of invisible battles between light and darkness. Cindy Trimm teaches that prayer is a powerful weapon to reclaim authority and victory. Key principles include understanding the enemy’s tactics‚ aligning prayers with God’s will‚ and using declarations to break strongholds. Trimm emphasizes the importance of a disciplined mindset‚ rejecting fear‚ and embracing faith. By applying these principles‚ believers can overcome negative patterns and walk in supernatural freedom‚ aligning their lives with God’s purpose and promises.

The Role of Prayer in Gaining Victory

Prayer is a vital tool in spiritual warfare‚ enabling believers to align with God’s will and break spiritual strongholds. Cindy Trimm emphasizes prayer as a means to achieve victory by transforming the mind and overcoming negative thought patterns. Through specific prayer strategies‚ such as declarations and commanding the morning‚ individuals can reclaim their authority and experience supernatural breakthroughs. Prayer not only equips believers for battle but also fosters intimacy with God‚ ensuring their actions and decisions reflect His purpose.

Importance of Prayer in Spiritual Warfare

Prayer is crucial in spiritual warfare‚ serving as a powerful tool to align with God’s truth‚ overcome darkness‚ and experience victory. It empowers believers to transform their minds and live victoriously.

How Prayer Empowers Believers in Spiritual Battles

Prayer aligns believers with God’s power‚ enabling them to overcome spiritual darkness. It equips them to rewire their minds‚ break negative patterns‚ and walk in victory. Through prayer‚ believers access divine strategies‚ gaining authority over spiritual battles. Consistent prayer fosters a mindset of faith‚ hope‚ and joy‚ transforming lives and empowering believers to fulfill their purpose. Cindy Trimm’s teachings emphasize prayer as a tool for daily empowerment‚ helping believers reclaim their spiritual influence and live a life of triumph.

Prayer as a Tool for Daily Empowerment and Protection

Prayer serves as a vital tool for daily empowerment and protection‚ helping believers align with God’s power to overcome challenges. By commanding your morning and declaring blessings‚ individuals can set a positive tone for the day. Prayer fosters mental clarity‚ strength‚ and resilience‚ enabling believers to face spiritual battles with confidence. It acts as a shield against negativity and discouragement‚ promoting a life of purpose and victory. Through consistent prayer‚ believers can experience transformation and live empowered lives‚ trusting in God’s guidance and protection.

Techniques and Strategies for Effective Warfare Prayer

Cindy Trimm emphasizes declarations‚ commanding your morning‚ and intentional prayer sessions to target specific areas. These strategies help break strongholds and align believers with God’s empowering grace.

Using Declarations and Affirmations in Prayer

Declarations and affirmations are powerful tools in spiritual warfare‚ enabling believers to claim God’s promises and break negative patterns. Cindy Trimm teaches that speaking truth aligns prayers with divine authority‚ fostering empowerment and protection. By declaring scripture and positive affirmations‚ individuals can shift their mindset and environment‚ creating a spiritual atmosphere conducive to victory. This practice strengthens faith‚ silences enemy lies‚ and unlocks breakthroughs‚ reinforcing believers’ identity in Christ and their ability to overcome challenges through intentional‚ authoritative prayer.

The Power of Commanding Your Morning

Commanding your morning is a transformative practice taught by Cindy Trimm‚ emphasizing the importance of starting the day with purpose and authority. By aligning prayers with God’s plan‚ believers can set a positive tone‚ fostering clarity and focus. This practice involves declaring blessings‚ protection‚ and victory‚ ensuring the day unfolds in alignment with divine intent. Trimm highlights how commanding the morning equips individuals to overcome negativity‚ gain spiritual strength‚ and walk in confidence‚ enabling them to face challenges and achieve victories throughout the day with God’s guidance and empowerment.

Benefits of Engaging in Warfare Prayer

Engaging in warfare prayer empowers believers to gain spiritual authority‚ experience profound breakthroughs‚ and live victoriously. It fosters resilience‚ clarity‚ and a deeper connection with God‚ transforming lives.

Personal Growth and Transformation Through Prayer

Warfare prayer‚ as taught by Cindy Trimm‚ catalyzes profound personal growth and transformation. By engaging in targeted‚ intentional prayer‚ believers can rewire their minds‚ break free from negative thought patterns‚ and align their lives with God’s purpose. This spiritual practice fosters resilience‚ clarity‚ and a deeper connection with God‚ enabling individuals to overcome internal and external struggles. Through prayer‚ people experience emotional healing‚ renewed faith‚ and a strengthened sense of identity‚ leading to a more empowered and purpose-driven life. This transformation equips believers to live victoriously and fulfill their divine destiny.

Impact on Spiritual Authority and Influence

Engaging in warfare prayer‚ as taught by Cindy Trimm‚ significantly enhances spiritual authority and influence. Through consistent‚ strategic prayer‚ believers gain confidence in their ability to impact their surroundings and others. This practice strengthens their voice in spiritual battles‚ enabling them to speak life‚ hope‚ and transformation into the lives of others. As individuals grow in prayer‚ they become influential leaders and mentors‚ equipped to inspire and guide others in their spiritual journeys‚ fostering a ripple effect of faith and victory in their communities and beyond.

Overcoming Challenges in Spiritual Warfare

Recognizing negative thought patterns and aligning with God’s truth helps believers overcome spiritual challenges. Consistent prayer and disciplined faith are key to achieving lasting victory and freedom.

Identifying and Breaking Negative Thought Patterns

Cindy Trimm’s teachings emphasize recognizing and confronting negative thought patterns‚ which are often rooted in lies from the enemy. By prayerfully rewiring the mind‚ believers can replace destructive thoughts with God’s truth. This transformation enables them to break free from mental strongholds‚ embracing a mindset of victory and hope. Through targeted prayer and affirmations‚ individuals can align their thoughts with divine purpose‚ overcoming spiritual warfare and living in freedom and empowerment.

Maintaining Consistency and Discipline in Prayer

Cindy Trimm emphasizes the importance of consistency and discipline in prayer to sustain spiritual strength. Establishing a daily prayer routine helps believers stay focused and aligned with God’s purpose. Through persistent prayer‚ individuals can overcome distractions and build resilience against spiritual attacks. Trimm encourages believers to declare their intentions and claim victory daily‚ fostering a mindset of faith and perseverance. By prioritizing prayer‚ believers experience transformative power‚ enabling them to walk in freedom and empowerment‚ even in challenging times.

Cindy Trimm’s teachings on spiritual warfare prayer offer a powerful path to victory and transformation. By embracing prayer as a daily discipline‚ believers can experience sustained spiritual strength and freedom‚ unlocking their full potential in Christ.

Summarizing the Key Takeaways

Cindy Trimm’s Warfare Prayer PDF emphasizes the power of prayer in spiritual warfare‚ offering practical strategies to overcome life’s challenges. Key takeaways include the importance of declarations‚ commanding your morning‚ and maintaining consistency in prayer. These principles empower believers to transform their mindset‚ break negative thought patterns‚ and gain spiritual authority. By applying these teachings‚ individuals can achieve personal growth‚ experience daily empowerment‚ and ultimately live a victorious life rooted in faith and prayer.

Encouragement for Continued Spiritual Growth

Cindy Trimm’s teachings inspire believers to embrace spiritual growth by trusting God’s plan and living with purpose. By prioritizing prayer and maintaining a hopeful‚ joyful‚ and expectant mindset‚ individuals can overcome challenges and walk in victory. Embracing daily empowerment through prayer fosters resilience and transforms lives. As Christ promised in John 10:10‚ believers are empowered to live abundantly. Continued spiritual growth requires consistency‚ discipline‚ and a willingness to trust God’s goodness‚ ensuring a life of purpose‚ influence‚ and lasting impact.

harry potter free pdf

The Harry Potter series, written by J.K. Rowling, is a globally acclaimed fantasy saga. It introduces readers to a magical world, where young wizard Harry Potter discovers his identity, attends Hogwarts School of Witchcraft and Wizardry, and confronts dark forces. The series spans seven books, beginning with Harry Potter and the Philosopher’s Stone, and has captivated readers of all ages with its rich storytelling and memorable characters. Fans often seek free PDF versions to access the series conveniently, though official sources are recommended for legality and quality.

Overview of the First Book: Harry Potter and the Philosopher’s Stone

Harry Potter and the Philosopher’s Stone, published in 1997, introduces readers to the magical world of Hogwarts. The story follows Harry, an orphan living with his neglectful relatives, who discovers his true identity as a wizard. Upon receiving a letter, Harry enrolls in Hogwarts School of Witchcraft and Wizardry, where he befriends Ron Weasley and Hermione Granger. Together, they unravel the mystery of the Philosopher’s Stone, a powerful alchemical object sought by the dark wizard, Lord Voldemort, who murdered Harry’s parents. The book captures Harry’s journey of self-discovery, friendship, and confrontation with evil, setting the foundation for the beloved series. Its themes of courage and destiny have made it a timeless classic, with fans worldwide seeking free PDF versions to experience the magic digitally.

Importance of the Philosopher’s Stone in the Series

The Philosopher’s Stone holds significant importance in the Harry Potter series, serving as the central plot device in the first book. It is a legendary alchemical object with the power to grant eternal life and transform base metals into gold. Lord Voldemort seeks it to regain his physical form and strength, while Harry must prevent this from happening. The Stone’s presence introduces key themes of immortality, greed, and the ethical use of power. Its destruction by Dumbledore ensures Voldemort’s temporary defeat, shaping the series’ overarching conflict. The Stone’s legacy reverberates throughout the series, symbolizing the eternal struggle between good and evil. Fans often download free PDFs of the first book to explore this iconic and pivotal element in detail. The Philosopher’s Stone remains a cornerstone of the Harry Potter narrative, encapsulating the series’ magical and moral depth.

Sources for Downloading Harry Potter Free PDF

Various platforms offer free PDF downloads of Harry Potter books, including official sources like Pottermore, libraries, and popular platforms such as Project Gutenberg and ManyBooks.

Official Sources for Harry Potter eBooks

Official sources for Harry Potter eBooks include J.K. Rowling’s website, Pottermore, and authorized retailers like Amazon, Barnes & Noble, and Apple Books. These platforms offer legal and high-quality downloads. Many libraries also provide free access through services like OverDrive, requiring only a library membership. Additionally, educational institutions often offer eBooks for students. Always ensure you are downloading from reputable sources to avoid unauthorized copies and support the author and publishers. Official sources guarantee a safe and lawful reading experience, preserving the quality of the original work. They also offer various formats, including PDF and EPUB, making it convenient for readers to enjoy the series digitally.

Popular Platforms Offering Free Harry Potter PDFs

Several platforms offer free Harry Potter PDFs, though many may not be authorized. Websites like Project Gutenberg or ManyBooks occasionally host free eBooks, but availability varies. Some fan forums or community-driven sites share PDFs, though these are often unauthorized. Additionally, platforms like Google Drive or Dropbox may host shared files, but users should verify their legitimacy. While these sources provide free access, they may infringe on copyright laws. Readers should always prioritize official sources to ensure quality and legality; Free PDFs from unofficial platforms may lack proper formatting or contain errors, so caution is advised when downloading from such sites.

Libraries and Educational Institutions Providing Free Access

Libraries and educational institutions often provide free access to Harry Potter eBooks through platforms like OverDrive or Scribd. Many public libraries offer digital lending services, allowing members to borrow eBooks legally. Educational institutions may include Harry Potter books in their digital collections for students and staff. These services typically require a valid library membership or institutional affiliation; Availability may vary by region due to licensing agreements. Libraries ensure access to high-quality, legitimate versions of the books, supporting both casual readers and academic purposes. This method is an excellent way to enjoy the series while adhering to copyright laws and supporting authors and publishers.

Safety and Legality of Downloading Harry Potter PDFs

Downloading Harry Potter PDFs from unauthorized sources is illegal and risky. It violates copyright laws, exposing users to legal consequences and potential malware. Always use official platforms.

Understanding Copyright Laws for eBooks

Copyright laws protect intellectual property, including eBooks like the Harry Potter series. These laws grant exclusive rights to authors and publishers, prohibiting unauthorized reproduction or distribution. Downloading or sharing copyrighted material without permission is illegal and can result in fines or legal action. eBooks are no exception, and violating these laws can have serious consequences; Always ensure you obtain eBooks from authorized sources to respect copyright and avoid legal repercussions.

Respecting copyright ensures fair compensation for creators and maintains the integrity of literary works.

Risks Associated with Torrent and Unauthorized Downloads

Downloading Harry Potter eBooks through torrents or unauthorized platforms poses significant risks. These sources often violate copyright laws, exposing users to legal consequences. Additionally, such files may contain malware or viruses, jeopardizing device security. Unauthorized downloads also support piracy, harming authors and publishers. Many torrents provide low-quality or incomplete versions of the books, diminishing the reading experience. Furthermore, accessing copyrighted material illegally can lead to fines or legal action. It is crucial to prioritize legal and safe methods to obtain Harry Potter PDFs to avoid these risks and support the creators of the series.

Always choose official or authorized platforms to ensure a safe and lawful reading experience.

How to Ensure Secure Downloads

To ensure secure downloads of Harry Potter PDFs, always use reputable and official sources. Verify the website’s authenticity by checking for HTTPS encryption and trusted reviews. Avoid torrents and unofficial platforms, as they often contain malware. Install antivirus software to scan downloaded files before opening them. Additionally, use a VPN to protect your online identity while browsing. When accessing free PDFs from libraries or educational institutions, log in through official portals to maintain security; Never share personal information on questionable sites. By following these steps, you can safely download and enjoy Harry Potter eBooks while protecting your device and data from potential threats.

Security should always be your priority when downloading digital content.

Devices and Formats for Reading Harry Potter PDFs

Harry Potter PDFs can be read on various devices, including eReaders, tablets, and smartphones. EPUB and PDF formats are widely supported, ensuring compatibility across different platforms for an optimal reading experience.

Compatibility with eReaders and Tablets

Harry Potter PDFs are compatible with popular eReaders like Amazon Kindle, Kobo, and Barnes & Noble Nook, as well as tablets such as iPads and Android devices. These devices support formats like PDF, EPUB, and MOBI, ensuring seamless reading. eReaders offer features like adjustable fonts, night mode, and bookmarking, enhancing the reading experience. Tablets provide larger screens for immersive reading, while apps like Adobe Acrobat and Google Play Books allow PDF viewing. For optimal compatibility, users can convert PDFs to EPUB using tools like Calibre. This flexibility makes it easy to enjoy Harry Potter eBooks on various devices, catering to different preferences and reading habits.

Optimizing PDFs for Mobile Devices

Optimizing Harry Potter PDFs for mobile devices ensures a smooth reading experience. Users can compress PDF files using tools like Smallpdf or Adobe Acrobat to reduce file size, minimizing storage and data usage. Adjusting the layout and text settings within PDFs allows for better readability on smaller screens. Additionally, converting PDFs to mobile-friendly formats like EPUB or MOBI enhances compatibility with devices. Many free PDF readers, such as Google Play Books and Foxit PDF, offer features like text reflow, night mode, and zoom, further improving the mobile experience; By following these steps, fans can enjoy Harry Potter eBooks effortlessly on their smartphones and tablets, making the series more accessible anytime, anywhere.

Using eBook Readers for Enhanced Reading Experience

Using eBook readers can significantly enhance your reading experience of Harry Potter PDFs. Devices like Amazon Kindle, Kobo, and Barnes & Noble Nook offer features such as adjustable font sizes, night mode, and bookmarks, making it easier to immerse yourself in the magical world. Additionally, apps like Google Play Books and Apple Books provide seamless integration across multiple devices, allowing you to pick up where you left off. The portability and convenience of eBook readers ensure that you can enjoy Harry Potter’s adventures anytime, anywhere, with optimal comfort and clarity. This modern way of reading brings the timeless story to life in a more accessible and engaging way.

Regional Availability of Harry Potter Free PDFs

The availability of free Harry Potter PDFs varies by region due to copyright laws and distribution agreements. In the US, UK, and Europe, access is often limited, but some libraries and educational institutions offer free downloads legally. Regional restrictions may apply, so checking local sources or official retailers is recommended for legal access.

Accessing Free PDFs in the United States

In the United States, accessing free Harry Potter PDFs can be challenging due to strict copyright laws. However, some public libraries and educational institutions offer free e-book rentals through platforms like OverDrive or Scribd. These services often require a library membership or student ID for access. Additionally, certain promotional events or limited-time offers may provide free downloads legally. Availability varies by region, and users must ensure they are accessing content through authorized channels to avoid copyright infringement. Always prioritize official sources or platforms partnered with publishers to guarantee a safe and legal reading experience.

Availability in the United Kingdom and Europe

In the United Kingdom and Europe, accessing free Harry Potter PDFs is often limited due to copyright protections enforced by J.K. Rowling and her publishers. However, public libraries and educational institutions in these regions may offer free e-book rentals of the series through platforms like OverDrive or BorrowBox. Availability varies by country, and some libraries may require membership or residency verification. Additionally, certain regions may have promotional periods where the books are available for free download. Always check local libraries or educational portals for legal access options. Be cautious of unauthorized downloads, as they may violate copyright laws and pose security risks.

Regional Restrictions and Workarounds

Regional restrictions often limit access to free Harry Potter PDFs due to copyright and licensing agreements. Users in some countries may find that certain platforms or sources are blocked or unavailable. To circumvent these restrictions, some employ VPNs to mask their location, allowing access to geographically restricted content. However, this practice is legally and ethically questionable. Additionally, exploring alternative sources like regional libraries or educational institutions can provide lawful access. Always prioritize legal methods to avoid potential legal consequences and ensure a safe, virus-free reading experience. Users should be cautious of unauthorized downloads, as they may infringe on copyright laws and expose devices to security risks.

Additional Resources and Guides

Beyond the main series, fans can explore companion books like Fantastic Beasts and The Tales of Beedle the Bard. Reading guides and study aids offer deeper insights into the wizarding world, enhancing the reading experience with analyses and behind-the-scenes content.

Companion Books and Supplementary Materials

J.K. Rowling’s Fantastic Beasts and Where to Find Them and The Tales of Beedle the Bard offer deeper insights into the wizarding world. These companion books expand on magical creatures and folklore, enriching the Harry Potter experience. Quidditch Through the Ages and The History of Magic in North America provide additional context. Fans can also explore character backstories and world-building through these materials. While the main series is often sought as free PDFs, these supplementary works are equally popular. They are available on fan sites and libraries, but ensuring legality is crucial. These resources enhance understanding and appreciation of the Harry Potter universe, making them invaluable for enthusiasts seeking more magical content.

Reading Guides and Study Aids for the Series

Reading guides and study aids for the Harry Potter series are invaluable for deeper understanding and analysis. These resources often include chapter summaries, character analyses, and thematic discussions. Fans can find free PDF guides online, offering insights into magical themes, motifs, and character development. Study aids are particularly useful for students and educators, providing discussion questions and critical perspectives. Many platforms offer these materials, enhancing the reading experience. They also explore the series’ broader themes, such as friendship, prejudice, and the battle between good and evil. These resources are a great companion for readers seeking to enrich their journey through the wizarding world.

clerks award pay guide 2024

The Clerks Award Pay Guide 2024 provides essential information on pay rates, allowances, and entitlements for clerical and office roles, effective from 1 July 2024. It outlines the minimum wage increase and updates to allowances, ensuring compliance with the Fair Work Commission’s 2024 review. This guide is a vital resource for employers and employees in the private sector, offering clarity on classifications, shift penalties, and payment structures.

Key Updates in the 2024 Clerks Award Pay Guide

The 2024 guide features a 3.75% minimum wage increase effective 1 July 2024, alongside updates to allowances and loadings, ensuring alignment with the Fair Work Commission’s annual wage review.

3.75% Minimum Wage Increase Effective 1 July 2024

The 3.75% minimum wage increase under the Clerks Award Pay Guide 2024 is a significant update, effective from the first full pay period on or after 1 July 2024. This adjustment reflects the Fair Work Commission’s 2024 Annual Wage Review, ensuring wages keep pace with economic conditions. The increase applies to all classifications of clerical employees, including full-time, part-time, and casual workers. Employers must implement this rise to comply with the updated award provisions. The new rates are calculated based on the previous year’s wages, with adjustments rounded to the nearest cent for accuracy. This change aims to improve the purchasing power of employees and maintain fair compensation standards across the private sector. The 3.75% increase is a key component of the 2024 pay guide, ensuring clarity and consistency for both employers and staff.

Changes to Allowances and Loadings

The Clerks Award Pay Guide 2024 includes updates to allowances and loadings, effective from the first full pay period on or after 1 July 2024. These changes aim to align with the Fair Work Commission’s annual wage review and economic conditions; Key adjustments include increases to specific allowances, such as meal, travel, and shift work penalties. Loadings for casual employees and overtime rates have also been revised to reflect the new wage structure. Employers are required to update their payroll systems to incorporate these changes, ensuring compliance with the award’s provisions. The updated allowances and loadings apply to all classifications of clerical employees, including full-time, part-time, and casual staff. These adjustments ensure fair compensation for employees working under varying conditions, such as night shifts or overtime. The changes are detailed in the pay guide, providing clarity for both employers and employees.

Clerks Award Classifications and Levels

The Clerks Award establishes structured classifications and levels for clerical roles, defining pay rates and responsibilities based on experience and skill. These levels range from entry-level to senior positions.

Understanding Clerk Classifications

The Clerks Award categorizes employees into distinct classifications based on their roles, responsibilities, and skill levels. These classifications determine the appropriate pay rates and entitlements for clerical staff. They range from entry-level positions, such as junior clerks, to more senior roles requiring specialized skills or supervisory duties. Each classification reflects the complexity and scope of tasks performed, ensuring fair compensation aligns with job requirements. Employers and employees can refer to these classifications to understand expectations and entitlements clearly. The Clerks Award also provides guidelines for progression between levels, offering transparency in career advancement opportunities. By structuring roles this way, the Award promotes consistency and equity across the private sector. For detailed information, the full classification guide is available, outlining each level’s specific duties and corresponding pay rates. This system ensures clarity and fairness in remuneration and job responsibilities.

Pay Rates for Different Levels of Employment

The Clerks Award Pay Guide 2024 outlines specific pay rates for different levels of employment within the clerical and office sectors. These rates are structured to reflect the varying responsibilities and skill requirements of each role. For instance, entry-level positions, such as clerical assistants, are assigned lower pay rates, while more experienced roles, like senior clerks or supervisors, receive higher compensation. The pay rates are determined based on the Fair Work Commission’s 2024 minimum wage review, which introduced a 3.75% increase effective from 1 July 2024. Employees are classified into distinct levels, each with predefined pay scales, ensuring equitable compensation across the private sector. Employers and employees can refer to these standardized pay rates to ensure compliance with the Award requirements. This system promotes transparency and fairness in remuneration for all clerical staff.

2024 Pay Rates for Clerks in the Private Sector

The 2024 pay rates reflect a 3.75% increase, effective 1 July 2024, as per the Fair Work Commission’s review, ensuring updated remuneration for private sector clerical roles.

Weekly and Hourly Pay Rates

The 2024 Clerks Award Pay Guide outlines specific weekly and hourly pay rates for clerical roles in the private sector, effective from the first full pay period on or after 1 July 2024. These rates reflect the 3.75% minimum wage increase mandated by the Fair Work Commission. For full-time employees, the weekly pay rates vary based on classification levels, with hourly rates calculated by dividing the weekly rate by 38 hours. Part-time and casual employees receive proportional rates, with casuals entitled to a 25% loading. The guide provides detailed tables distinguishing between adult rates and junior rates, ensuring clarity for employers and employees. Shift penalties, such as afternoon, night, and permanent night shift loadings, are also incorporated into the hourly rates. These updated pay rates aim to align with current economic conditions while maintaining fair compensation for clerical workers across all employment types.

Afternoon, Night, and Permanent Night Shift Rates

The 2024 Clerks Award Pay Guide includes specific loadings for employees working afternoon, night, or permanent night shifts. Afternoon shifts attract a loading of 15%, while night shifts receive a 20% loading on top of the base rate. Permanent night shift workers are entitled to a higher loading of 25% to recognize their consistent night work. These loadings are applied to the hourly rate and are in addition to the base pay. The rates are effective from the first full pay period on or after 1 July 2024, aligning with the Fair Work Commission’s updates. These adjustments ensure fair compensation for employees working non-standard hours, reflecting the challenges of night and afternoon shifts. Employers must apply these loadings to maintain compliance with the award’s requirements.

Allowances and Loadings Under the Clerks Award

The Clerks Award outlines allowances and loadings, including shift penalties and special allowances, effective from 1 July 2024, to compensate for various work conditions.

Types of Allowances

The Clerks Award includes various allowances to compensate employees for specific work-related expenses or conditions. These include meal allowances, travel allowances, and uniform or clothing allowances. Additionally, there are shift penalties for working during non-standard hours, such as afternoon, night, or permanent night shifts. Other allowances cover first aid, tool usage, or specialized skills. These payments are provided in addition to the base wage rate and are designed to offset costs or recognize particular responsibilities. The 2024 pay guide details the updated rates for each allowance, ensuring they align with current economic conditions. Employers must adhere to these provisions to remain compliant with the Clerks Award requirements, fostering fair compensation for all eligible employees.

Increases in Allowances Effective 1 July 2024

Effective 1 July 2024, the Clerks Award introduced increases to various allowances, reflecting the Fair Work Commission’s annual wage review. These adjustments ensure allowances align with current economic conditions and provide fair compensation for employees. Meal allowances, travel allowances, and uniform or clothing allowances have been updated, with specific rates outlined in the 2024 pay guide. Additionally, shift loadings for afternoon, night, and permanent night shifts have been adjusted to reflect the 3.75% increase. These changes aim to support employees in managing work-related expenses and recognizing the demands of non-standard working hours. Employers are required to implement these updated rates to remain compliant with the Clerks Award provisions, ensuring employees receive the correct entitlements from the first full pay period on or after 1 July 2024.

2010 mazda 3 workshop manual pdf

The 2010 Mazda 3 Workshop Manual is a comprehensive guide designed to help users understand and maintain their vehicle effectively. It provides detailed instructions, torque specifications, and part diagrams, ensuring safe and proper repairs. Whether you’re a DIY enthusiast or a professional mechanic, this manual is an essential resource for troubleshooting and performing routine maintenance. By following its recommendations, you can ensure the longevity and reliability of your Mazda 3.

1.1 Overview of the Manual’s Purpose and Structure

The 2010 Mazda 3 Workshop Manual is structured to guide users through maintenance and repairs. It includes sections on torque specifications, part diagrams, and detailed procedures. Designed for both DIY enthusiasts and professionals, the manual ensures safe and effective servicing. Its clear organization helps users navigate topics effortlessly, making it an indispensable tool for maintaining the Mazda 3’s performance and longevity.

1.2 Importance of Using the Workshop Manual for Repairs and Maintenance

The workshop manual is essential for accurate repairs and maintenance, providing torque specifications, part diagrams, and troubleshooting guidance. It ensures compliance with Mazda standards, reducing errors and potential damage. Regular use promotes preventive care, enhancing reliability and performance. By following the manual, owners can maintain their vehicle effectively, ensuring safety and optimal operation over time.

Transmission Fluid Specifications for the 2010 Mazda 3

The 2010 Mazda 3 requires GL-4 transmission fluid with a viscosity of 75w-90. Using the correct specifications ensures optimal performance, longevity, and compatibility with Mazda’s transmission system.

2.1 Recommended Transmission Fluid Type (GL-4, 75w-90)

The 2010 Mazda 3 requires a GL-4 transmission fluid with a 75w-90 viscosity rating for optimal performance. This specification ensures proper lubrication, smooth gear shifting, and compatibility with the transmission’s components. Using the correct fluid type prevents damage, maintains efficiency, and extends the lifespan of the transmission system. Always refer to the workshop manual for precise recommendations to avoid potential issues.

2.2 Importance of Using Correct Fluid Specifications

Using the correct transmission fluid specifications is crucial for maintaining optimal performance and longevity. Incorrect fluid can cause damage to gears, seals, and other components, leading to costly repairs. The right fluid ensures smooth shifting, protects against wear, and maintains efficiency in extreme temperatures. Always adhere to the workshop manual’s recommendations to prevent potential issues and ensure reliable operation of your Mazda 3’s transmission system.

OEM vs. Aftermarket Parts for the 2010 Mazda 3

This section compares OEM and aftermarket parts for the 2010 Mazda 3, discussing their benefits, drawbacks, and suitability for repairs and maintenance.

3.1 Benefits and Drawbacks of OEM Parts

OEM parts are designed and manufactured by Mazda, ensuring precise fitment and reliability. They come with a warranty and maintain vehicle performance. However, they can be more expensive than aftermarket alternatives. While they offer superior quality and compatibility, the higher cost may deter some owners seeking budget-friendly solutions for repairs or replacements.

3.2 Pros and Cons of Aftermarket Parts

Aftermarket parts offer cost savings and diverse options, making them a popular choice for repairs. They are often readily available and can be more affordable than OEM parts. However, quality can vary, and compatibility issues may arise. Some may void warranties or lack manufacturer support, potentially affecting vehicle performance and reliability over time.

Transmission Fluid Replacement Guidelines

Replace transmission fluid every 30,000 to 60,000 miles for optimal performance. Use GL-4 75w-90 fluid, as specified. Always follow torque specs for a secure drain plug replacement.

4.1 When to Replace Transmission Fluid

Replace transmission fluid every 30,000 to 60,000 miles for optimal performance. Use GL-4 75w-90 fluid, as specified. Always follow torque specs for a secure drain plug replacement.

4.2 Step-by-Step Process for Fluid Replacement

Jack up the vehicle, remove the drain plug, and let the old fluid flow into a pan. Replace the plug securely using the specified torque. Install a new filter and refill with GL-4 75w-90 fluid. Lower the car and check for leaks. Dispose of used fluid responsibly. Refer to the manual for specific torque specs and fluid capacity;

Solving Battery Issues in the 2010 Mazda 3

The 2010 Mazda 3 often experiences dead battery issues due to electrical system malfunctions. Removing the DCM fuse and performing a software update typically resolves the problem.

5.1 Common Causes of Dead Battery Problems

Dead battery issues in the 2010 Mazda 3 often arise from electrical system malfunctions, such as faulty fuses or software glitches. The DCM fuse removal and subsequent software updates, as outlined in the manual, are common fixes. Additionally, parasitic drains from accessories or defective alternators can cause persistent battery drain. Regular inspection of electrical connections and components is crucial to prevent such issues.

5.2 DCM Fuse Removal and Software Update Solution

Removing the DCM fuse and performing a software update often resolves persistent battery issues. Start by locating the fuse box, identifying the DCM fuse, and disconnecting the battery for safety. Remove the fuse, wait a few minutes, then reconnect it. Consult an authorized Mazda dealer or technician to ensure the software update is correctly applied, restoring proper electrical system functionality and preventing future issues.

Bluetooth Connectivity in the 2010 Mazda 3

The 2010 Mazda 3 features Bluetooth connectivity for hands-free calls and audio streaming. This system enhances convenience, allowing seamless integration with compatible devices for an improved driving experience.

6.1 Overview of Bluetooth Functionality

The 2010 Mazda 3’s Bluetooth system supports hands-free calling and audio streaming, integrating with compatible devices for enhanced convenience. It allows drivers to manage calls and music seamlessly, improving safety and entertainment. This feature ensures a connected driving experience, compatible with various smartphones and devices, as detailed in the workshop manual. Proper setup and pairing ensure optimal functionality. Regular updates may be needed for compatibility.

6.2 Troubleshooting Common Connectivity Issues

Common Bluetooth issues in the 2010 Mazda 3 include unstable connections or failure to detect devices. Resetting the system, checking device compatibility, and ensuring the latest software updates are installed can resolve many problems. If issues persist, consulting the workshop manual for detailed troubleshooting steps or seeking assistance from an authorized Mazda dealer is recommended. Proper diagnostics ensure reliable functionality.

Benefits of Using the Workshop Manual for Maintenance

The workshop manual provides detailed maintenance instructions, ensuring proper care and extending the Mazda 3’s lifespan. It’s organized for easy understanding, covering essential procedures and specifications.

7.1 Detailed Instructions for Routine Maintenance

The manual offers step-by-step guides for routine tasks like oil changes, tire rotations, and fluid checks. It specifies intervals, tools, and materials needed, ensuring compliance with Mazda standards. Clear diagrams and torque specifications help prevent errors. Following these instructions helps maintain performance, efficiency, and reliability, while avoiding costly repairs down the line. Regular maintenance is key to extending the vehicle’s life.

7.2 Importance of Following Recommended Service Intervals

Adhering to the recommended service intervals ensures optimal performance, reliability, and longevity of your Mazda 3. Regular maintenance prevents potential issues before they arise, reducing repair costs and downtime. The manual outlines specific timelines for tasks like oil changes and inspections, aligning with Mazda’s engineering standards. Neglecting these schedules can lead to premature wear and compromised safety, emphasizing the importance of consistency in upkeep.

Common Problems and Solutions for the 2010 Mazda 3

The 2010 Mazda 3 may experience issues like dead batteries and connectivity problems. Solutions often involve DCM fuse removal and software updates, ensuring reliable operation and performance.

8.1 Frequently Asked Questions (FAQs)

What are the common problems with the 2010 Mazda3? Issues include dead batteries, connectivity problems, and transmission concerns. How reliable is the 2010 Mazda3? It is generally reliable with proper maintenance. What is the fuel economy? It averages around 22-28 MPG. Where can I find repair guides? The workshop manual provides detailed instructions and part diagrams. How often should I service my Mazda3? Follow the recommended intervals in the manual for optimal performance.

8.2 Known Issues and Their Fixes

Common issues with the 2010 Mazda 3 include dead batteries, transmission problems, and Bluetooth connectivity issues. Replacing the DCM fuse and updating software often resolves battery and connectivity problems. For transmission concerns, using the correct GL-4 75w-90 fluid and adhering to the manual’s guidelines addresses issues effectively. Regular maintenance, as outlined in the workshop manual, helps prevent these problems and ensures optimal vehicle performance.

Importance of Regular Maintenance for Reliability

Regular maintenance is crucial for ensuring the 2010 Mazda 3’s longevity and performance. Adhering to the workshop manual’s service intervals helps prevent mechanical failures and enhances reliability.

9.1 Tips for Ensuring Trouble-Free Operation

Regular fluid checks, adherence to service intervals, and addressing issues promptly are key to trouble-free operation. Always use genuine parts and follow manual procedures. Ensure proper tire pressure, inspect brakes regularly, and monitor battery health. Keep the vehicle clean and protect it from extreme conditions. Refer to the workshop manual for specific guidance tailored to your Mazda 3.

9.2 Role of the Workshop Manual in Preventative Care

The workshop manual plays a crucial role in preventative care by providing detailed maintenance schedules and diagnostic procedures. It helps identify potential issues before they escalate, ensuring your Mazda 3 runs smoothly. With clear instructions and specifications, it empowers owners to perform routine checks and necessary repairs, ultimately enhancing the vehicle’s reliability and longevity.

Where to Find the 2010 Mazda 3 Workshop Manual

The 2010 Mazda 3 Workshop Manual can be found at authorized Mazda dealerships or online through forums and websites offering PDF downloads, ensuring reliability and authenticity.

10.1 Authorized Mazda Dealerships

Authorized Mazda dealerships offer the most reliable source for the 2010 Mazda 3 Workshop Manual. These dealerships provide genuine manuals, either in print or digital formats, ensuring accuracy and completeness. Additionally, they offer expert support, including software updates and technical assistance, making them a trusted resource for maintenance and repairs. Visit an authorized Mazda dealership for authentic and comprehensive guidance tailored to your vehicle’s needs.

10.2 Online Resources and PDF Downloads

Online resources provide convenient access to the 2010 Mazda 3 Workshop Manual in PDF format. Websites like workshopmanuals.org and forums such as mazda3tech.com offer downloadable versions, often free or at a low cost. These PDFs include detailed torque specifications, part diagrams, and step-by-step instructions. Ensure to verify the source for authenticity and completeness to avoid incomplete or incorrect information, which is crucial for safe and effective repairs.

DIY Repair Guides Using the Workshop Manual

The 2010 Mazda 3 Workshop Manual offers detailed DIY repair guides, including torque specifications and part diagrams, to help owners perform maintenance and repairs with confidence.

11.1 Torque Specifications and Part Diagrams

The 2010 Mazda 3 Workshop Manual provides precise torque specifications for bolts and nuts, ensuring accurate tightening. Detailed part diagrams illustrate component locations and assembly, aiding in identification and repair. These resources help prevent damage and ensure reliability, making DIY repairs safer and more efficient. The manual’s clarity and detail are invaluable for both novice and experienced mechanics, fostering confidence in maintenance tasks.

11.2 Detailed Instructions for Common Repairs

The 2010 Mazda 3 Workshop Manual offers step-by-step guides for common repairs, ensuring clarity and precision. From brake replacements to engine overhauls, instructions are tailored for both DIY enthusiasts and professional mechanics. The manual lists essential tools, provides visual aids, and outlines safety precautions, making complex tasks manageable. This comprehensive approach helps avoid errors and ensures repairs are done safely and effectively, preserving your vehicle’s performance and longevity.

Authorized Dealers vs. Independent Mechanics

Authorized Mazda dealers offer specialized tools, trained technicians, and genuine parts, ensuring factory-approved service. Independent mechanics provide cost-effective solutions with personalized attention, ideal for routine maintenance and repairs.

12.1 Benefits of Service at an Authorized Mazda Dealer

Servicing your 2010 Mazda 3 at an authorized dealership ensures access to factory-trained technicians, genuine Mazda parts, and advanced diagnostic tools. This guarantees adherence to Mazda’s specifications, maintaining your vehicle’s performance and reliability. Additionally, authorized dealers honor warranties, provide detailed service records, and offer specialized care tailored to your Mazda, ensuring optimal results and peace of mind for owners.

12.2 When to Choose an Independent Mechanic

Independent mechanics can be a cost-effective option for routine maintenance and repairs, especially when specialized tools or dealership expertise aren’t required. They often charge lower labor rates and may offer more personalized service. Additionally, with access to the 2010 Mazda 3 workshop manual, independent mechanics can follow Mazda’s guidelines, ensuring quality repairs without the higher costs of a dealership. This makes them a viable choice for owners seeking affordable, trusted care.

The 2010 Mazda 3 Workshop Manual is an invaluable resource for owners and technicians, providing detailed guidance for maintenance, repairs, and troubleshooting. Use it to ensure optimal performance and longevity of your vehicle.

13.1 Summary of Key Points

The 2010 Mazda 3 Workshop Manual is a detailed guide covering essential repairs, maintenance, and troubleshooting. It emphasizes proper transmission fluid use, diagnosing battery issues, and choosing between OEM and aftermarket parts. The manual also provides DIY repair guides, torque specifications, and part diagrams. Regular maintenance, following service intervals, and using authorized resources ensure reliability and performance. Consult it for comprehensive care and optimal vehicle operation.

13.2 Final Thoughts on Using the Workshop Manual

The 2010 Mazda 3 Workshop Manual is an indispensable resource for ensuring optimal vehicle performance and longevity. By following its detailed instructions, torque specifications, and maintenance recommendations, owners can address issues confidently. Regular use of the manual promotes preventative care, reducing repair costs and enhancing safety. Whether for DIY projects or professional servicing, it remains a vital tool for maintaining your Mazda 3 effectively.